

Figuring Out Coolant Temp Sensor Readings
Alright, so the other day I was fiddling with my car again. It was acting a bit funny, especially on cold starts. Sometimes it would struggle to fire up, other times the temperature gauge seemed to do its own dance. Made me think about that little coolant temperature sensor, you know? The one that tells the car’s brain how hot or cold the engine is.
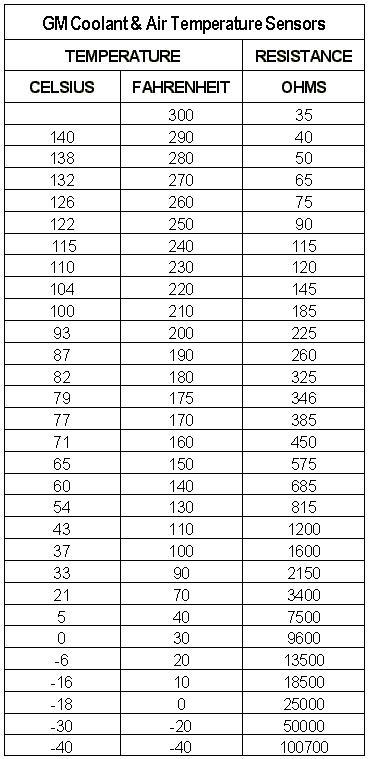
I figured, before throwing parts at it, I should probably test the darn thing. Seemed simple enough, just needed my multimeter. But then I hit a snag – what readings am I even looking for? A sensor like this changes its resistance based on temperature. So, a reading means nothing unless you know what it should be at a certain temperature.
Getting Down to Testing
First things first, I had to find the sensor. On my engine, it wasn’t too hard to spot, usually screwed into the thermostat housing or somewhere on the cylinder head where coolant flows. Got it located, then popped off the electrical connector. Gotta be careful not to break the clip, those things get brittle.
Then I grabbed my multimeter. Switched it over to measure resistance, the setting with the Omega symbol (Ω). The plan was simple:
- Measure the resistance when the engine was completely cold (left it overnight).
- Measure it again after letting the engine warm up properly.
The Hunt for Specs
This is where things got slightly annoying. I needed the correct resistance values for my specific car model and year. Just guessing wasn’t going to cut it. I spent a bit of time digging around online forums and looking through a digital copy of a service manual I had. Found a chart eventually! It listed approximate resistance values for different temperatures. For example, it might say something like 2500 Ohms at 20°C (around room temp) and maybe 200-300 Ohms at 80°C (operating temp).
Taking the Measurements
Okay, armed with the chart, I went back to the car. Engine was dead cold. I touched the probes of my multimeter to the pins inside the sensor itself (not the connector going to the car’s wiring). Got a reading. Wrote it down. Then I started the car, let it run until the temp gauge showed normal operating temperature. Shut it off, quickly disconnected the sensor again (careful, things are hot!), and took another reading. Wrote that down too.
Comparing the Numbers
Now the moment of truth. I looked at my cold reading and compared it to the chart’s value for a similar cold temperature. Then I did the same for the hot reading. In my case, the cold reading was way off what the chart suggested it should be. The hot reading was closer, but still not quite right.
The Result
Based on my readings being out of spec, especially the cold one, I decided the sensor was likely faulty. It wasn’t accurately telling the computer the engine temperature, which probably explained the starting issues and weird gauge behavior. I went ahead and got a new sensor, swapped it out (making sure to drain a bit of coolant first so it didn’t make a huge mess), plugged it in, and topped off the coolant.
Guess what? The car started up much better the next cold morning, and the temperature gauge seemed stable again. So, checking those resistance values against the manufacturer’s specs really helped pinpoint the problem without just guessing. It’s a pretty straightforward check if you have a multimeter and can find the right specs for your car.


