
Alright, so let me tell you about this watering can spout situation I had. It was driving me nuts, seriously.
The Problem with the Old Spout
My trusty old watering can, the one I’ve had for ages, its spout was just… done. Kaput. It was either clogged half the time, or it would dribble water everywhere but on the plants. You know the drill. Trying to water my delicate seedlings was like playing Russian roulette with a firehose. More water on the floor than in the pots, I tell ya.
Why I Decided to DIY
Now, I could’ve just gone out and bought a new one. Easy, right? But where’s the fun in that? Plus, I’m trying to be a bit more, you know, reuse-and-recycle these days. And honestly, I was kinda annoyed that such a simple thing was causing me so much grief. I figured, “How hard can it be to make a decent spout?” Famous last words, sometimes, but this time I was determined.
The Great Spout Experiment
So, I started looking around for what I could use. My first thought was some old plastic bottle. Seemed logical.
- Attempt 1: The Soda Bottle Fiasco. I cut the top off a soda bottle. Drilled some holes. Looked okay. Attached it to the can with some waterproof tape I had lying around. Disaster. The water pressure was all wrong. It either gushed out like a broken dam or barely trickled. The tape didn’t hold up well either. Total fail.
- Attempt 2: The Bendy Straw Idea. Then I thought, maybe something more flexible? I found a bunch of those thicker, bendy straws. I tried to bundle a few together, hoping for a gentle shower effect. Nope. Too flimsy, and the water just went wherever it pleased. Plus, looked ridiculous. My plants were probably laughing at me.
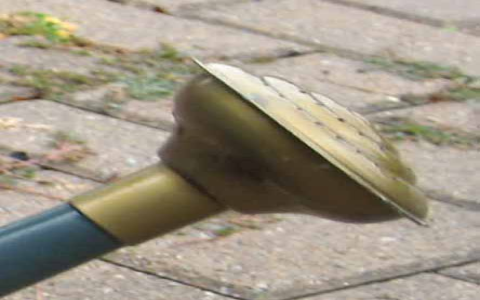
- Attempt 3: The “Aha!” Moment. I was about to give up and head to the store, feeling pretty defeated. Then I saw it – an old, small plastic funnel I wasn’t using. And a piece of thin, flexible tubing from some long-forgotten project. Lightbulb!
Putting It All Together (Finally!)
This time, I felt like I was onto something. I took the small funnel – its narrow end was about the right size. I then carefully drilled a series of tiny holes in a nice, even pattern around the wider end of the funnel, which would be the “rose” part of the spout. This was key, getting the holes small enough for a gentle sprinkle but enough of them for good flow.
Then, I attached the flexible tubing to the narrow end of the funnel. I had to make sure it was a snug fit. A bit of wiggling and pushing, and it was on there good. The other end of the tubing? That was the tricky part – getting it to attach securely to the watering can’s original opening. I ended up using a combination of that waterproof tape (used more carefully this time) and a cable tie to really cinch it down. It wasn’t the prettiest, I’ll admit, but I was going for function over form at this point.
The Result and My Thoughts
And you know what? It worked! Like a charm. The water came out in a perfect, gentle shower. My seedlings were no longer getting blasted into oblivion. It was such a relief. I actually stood there for a good five minutes just watering things, admiring my handiwork.
It’s not gonna win any design awards, this makeshift spout. It’s a bit Frankenstein-y. But it does the job, and it cost me exactly zero dollars. Plus, there’s that satisfaction, you know? Taking something that was frustrating and fixing it with a bit of ingenuity and stuff I already had. Sometimes, these little victories are the best. So yeah, that was my watering can spout adventure. Maybe it gives you an idea if you ever run into the same problem. Don’t be afraid to tinker!


