
Okay, here’s my take on sharing my super soil recipe small batch experience, blog style:
Super Soil Recipe: My Small Batch Adventure
Alright folks, so I finally bit the bullet and decided to try making my own super soil. I’ve been reading about it forever, and honestly, the pre-made stuff is just too damn expensive. Plus, I like knowing exactly what’s going into my plants. This is how it went down.
Getting Started: The Shopping Spree
First things first, I had to gather all the ingredients. Man, that was a mission in itself! Here’s what I ended up grabbing:
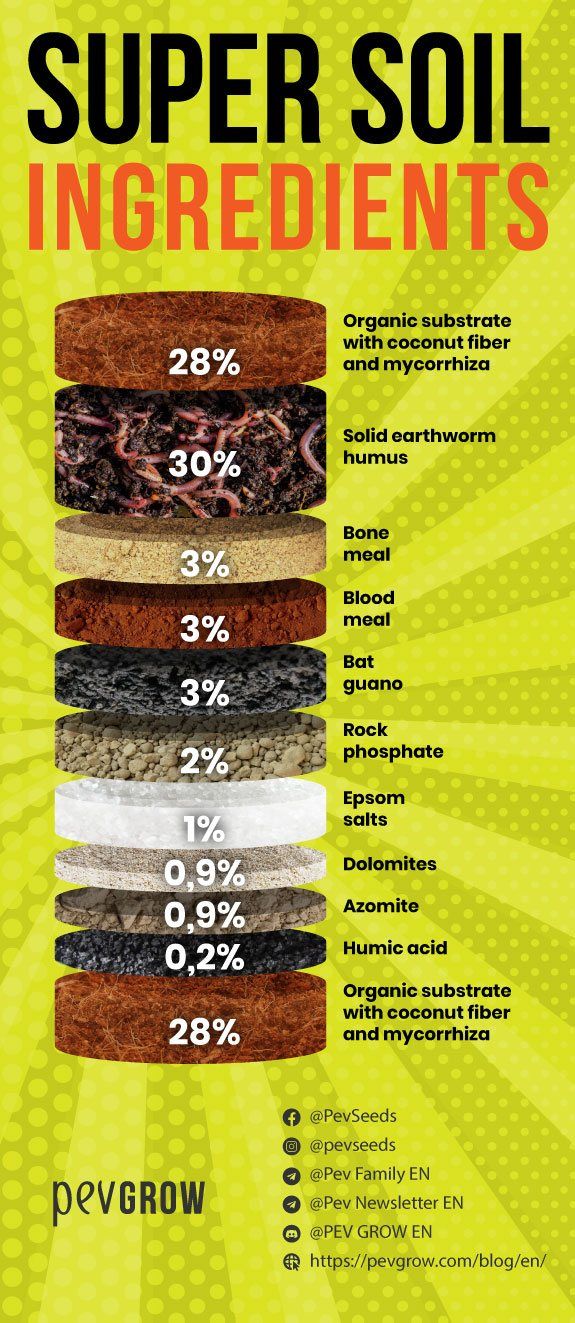
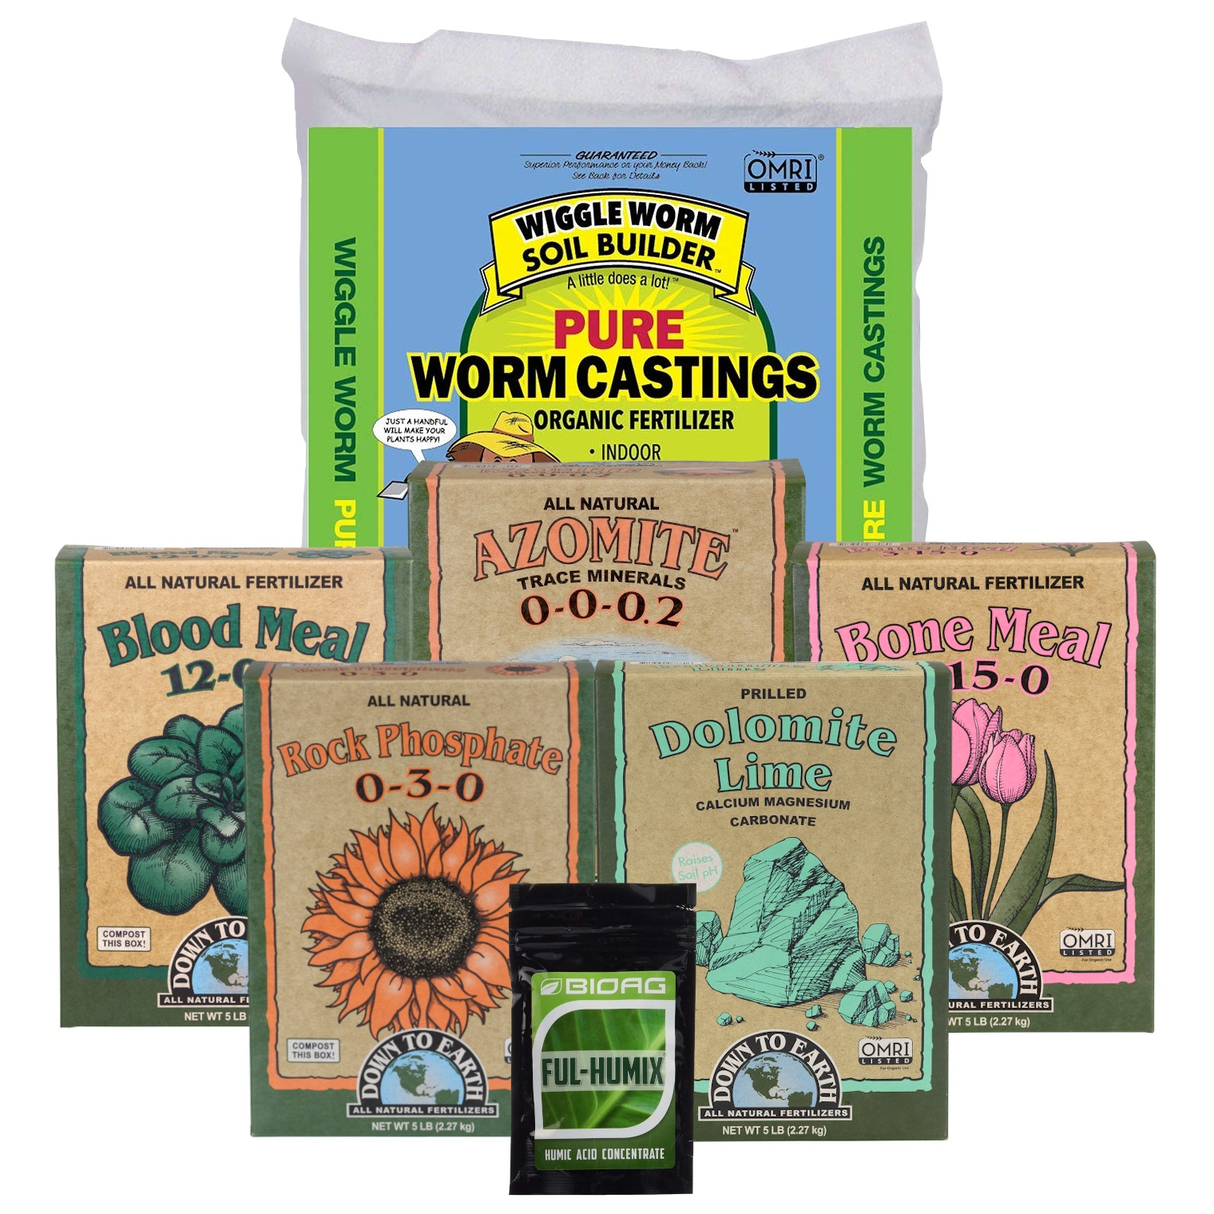
- High-quality peat moss: This was actually harder to find than I thought.
- EWC (earthworm castings): Found a local place that sells the good stuff. Smells earthy, which is a good sign!
- Perlite: Gotta have that drainage!
- Compost: Used some homemade stuff and supplemented with a bag from the store to make enough.
- Bone meal: For that phosphorus boost.
- Blood meal: Nitrogen, baby!
- Kelp meal: All the micronutrients!
- Rock phosphate: Slow-release phosphorus.
- Dolomite lime: For pH buffering and calcium/magnesium.
- Mycorrhizae: To help those roots get happy.
The Mixing Begins (and My Mistakes)
Okay, so I had my list of ingredients and started to follow my recipe. One of the first issues I ran into was measurement. I tried eyeballing some of the smaller amendments, and that was a bad idea. Ended up with way too much kelp meal in one spot! Lesson learned: measure everything precisely, even if it seems like a small amount.
I used a big tarp in my garage to mix everything. I started by layering the peat moss, compost, EWC, and perlite. Then, I sprinkled in the bone meal, blood meal, kelp meal, rock phosphate, dolomite lime, and mycorrhizae. Then I got to mixing.
Mixing was harder than I thought. Get ready for a workout! You’ve got to make sure everything is evenly distributed. I used a shovel and just kept turning it over and over. I ended up adding a bit of water to get it just slightly moist. Not soaking wet, but damp enough that it clumps together when you squeeze it.
The “Cooking” Phase
This is where the magic happens (hopefully!). I put the mixed soil into large plastic storage bins with lids. The idea is to let it “cook” for at least 30 days. During this time, the microbes break down the amendments and make them available to the plants.
I kept the bins in a dark corner of my garage and made sure the soil stayed slightly moist. I checked on it every week or so, giving it a good turn to keep things aerated. I noticed the soil started to smell richer and more earthy over time. Which i guess is a good sign.
The Big Test: Planting Time!
After about 40 days (I got a little impatient), I decided to try it out. I transplanted a few of my seedlings into pots filled with the super soil.
The Results (So Far)
It’s still early days, but so far, so good! The plants in the super soil are definitely growing faster and look healthier than the ones in regular potting mix. The leaves are a deeper green, and the stems are stronger. I haven’t had to add any extra nutrients, which is awesome.
Final Thoughts & Things I’d Change
Making your own super soil is definitely a worthwhile project, but it takes time and effort. Here’s what I learned:
- Measure everything! Don’t eyeball it.
- Don’t be afraid to get your hands dirty.
- Be patient with the cooking process.
Next time, I might experiment with adding some other ingredients, like neem seed meal or insect frass. But overall, I’m really happy with how my first batch of super soil turned out. I encourage you to give it a shot! You can save some money, and provide the best soil for your plants!


