

Okay, so fall is here, and it’s time to think about getting my clematis ready for winter. I’m no expert, but I’ve learned a few things over the years from messing up and, well, succeeding sometimes too. Here’s how I went about it this year:
Figuring Out My Clematis Type
First thing I did was double-check what kind of clematis I have. I’ve got a mix, you know? Some bloom on old wood, some on new. This year, I re-checked my plant tags and made sure what group they belongs. It’s kinda crucial because you prune them differently.
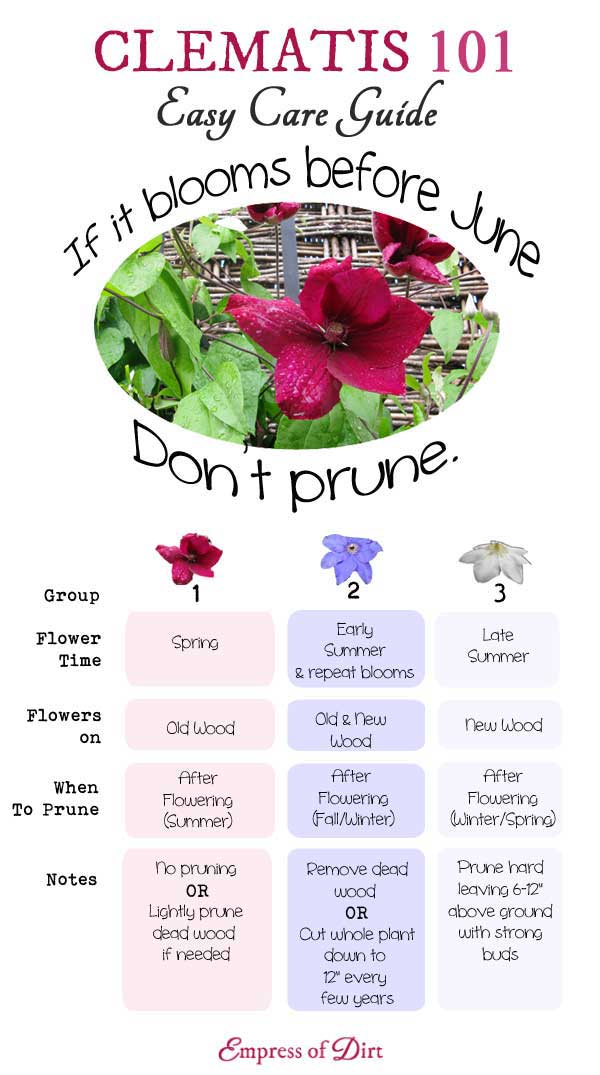
- Group 1: These guys flower on last year’s growth. I usually just leave them alone, maybe tidy them up a bit after they bloom.
- Group 2: This group blooms on both old and new growth. I trimmed some of the dead stuff, but carefully!
- Group 3: Ah, these are the easy ones. They bloom on new growth, so I whacked them back pretty hard.
The Actual Pruning Part
So, with my trusty clippers (I cleaned them with some rubbing alcohol first – gotta keep things sanitary!), I got to work.
For my Group 2 clematis, I just snipped off any dead or weak-looking stems. I found a few crossing branches, so I took those out too. I tried to leave as much healthy growth as possible, since that’s where I’ll get flowers next spring.
My Group 3 clematis? Total haircut. I cut them back to about 12-18 inches from the ground. I know, it looks drastic, but they love it. It encourages tons of new growth and, therefore, tons of flowers.
Feeding and Watering
After pruning, I gave them all a good meal. I used some slow-release fertilizer, sprinkled it around the base of the plants, and gently worked it into the soil. I watered them deeply to help the fertilizer soak in. It’s like giving them a good Thanksgiving dinner before their long winter nap.
Mulching for Warmth
I live where it gets pretty cold, so mulching is a must. I piled on a thick layer of shredded leaves and some compost around the base of each plant. This keeps the roots cozy and protected from the freezing and thawing cycles that can really mess with them.
Cleaning Up
I collected all the pruned stems and leaves and tossed them in my compost bin. Keeping the area clean helps prevent any diseases from hanging around over winter.
Fingers Crossed!
And that’s it! Now it’s just a waiting game. I’m pretty confident my clematis will be happy and healthy come springtime. I’ll keep an eye on them during the winter, make sure the mulch is still in place, and maybe water them if we have a really dry spell. But mostly, it’s time for them to rest, and for me to start dreaming about next year’s blooms!


