
Alright, let me tell you about my recent adventure with a soil sampling auger. Been meaning to get to the bottom of why my back patch of veggies always looks a bit sad, you know? Figured it was time to stop guessing and actually see what’s going on under the surface.
Getting Started with this Contraption
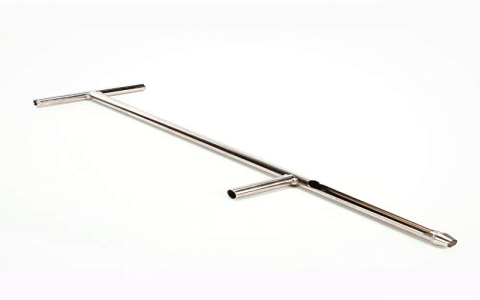
So, I got my hands on one of these soil augers. Nothing fancy, just a basic T-handle one. Looked simple enough. My first thought was, “How hard can this be?” Famous last words, right?
I went out to that problematic patch. The sun was beating down, already not my favorite start. I grabbed the auger, planted it on the spot I wanted to test, and started twisting. Man, that first try was a bit of a workout! I was expecting it to just sort of screw itself into the ground like a corkscrew into a wine bottle. Nope.
The Actual Digging – Or Twisting, I Guess
I had to put some real weight into it. Lean on it, twist, lean, twist. It wasn’t just gliding in. I quickly realized you gotta apply steady downward pressure while turning. If you just twist, you’re not going anywhere. If you just push, well, you’re just standing there looking silly pushing a metal stick.
After a bit of huffing and puffing, it started to bite. I’d twist it down a few inches, then pull it up. The little spiral grooves on the auger were supposed to hold the soil, and they did, mostly. Sometimes a bit would crumble off, but that’s just how it goes, I reckon.
- First spot: Hit something hard about six inches down. Probably a rock. Moved over a foot.
- Second spot: Got a decent core. Pulled it out, and there it was – a nice little cylinder of soil.
I repeated this process in a few different spots around that sad patch. Each time, it was a similar story: push, twist, pull. My hands were getting a bit sore from gripping the handle, not gonna lie. And yeah, I got dirt on my knees, my hands, probably on my face too. It’s not a clean job, this soil sampling business.
Looking at What I Got
So, I had these soil cores laid out on a piece of cardboard. And you know what? It was pretty revealing. That top layer, the first few inches, looked okay. Darkish, a bit of organic matter. But then, as I looked at the soil from deeper down, it was a different story. It was much lighter in color, and when I squeezed it, it felt really dense and clay-like. Clumped up real tight.
I wasn’t expecting it to be that bad, honestly. I always just threw compost on top, figured that was enough. Clearly, that good stuff wasn’t making its way down deep enough, or not enough of it anyway.
What I Learned and What’s Next
So, this whole auger thing, while a bit more effort than I initially thought, was super useful. It wasn’t just some fancy tool to look professional. It actually showed me what the problem likely was – poor drainage and compacted clay soil deeper down, starving the roots of air and making it hard for them to spread.
My big takeaway? Sometimes you just gotta get your hands dirty, literally, and dig a bit deeper to understand what’s really going on. That auger helped me do just that. Now, I know I need to do more than just top-dress. I’m thinking about broader forking, maybe working in a lot more organic matter deeper down this autumn. It’s gonna be more work, but at least now I’m not just guessing.
So yeah, the soil sampling auger. Bit of a grunt to use sometimes, but worth it in the end. Glad I did it.


